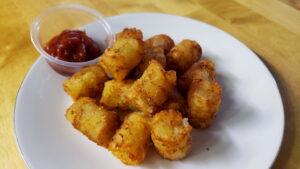
Tater tots are a frozen food staple, but did you know you can make perfect tots at home from scratch with fresh potatoes and a Tot Maker? You don’t need fillers, flour, or factory machines — just potatoes, salt, pepper, and a mold made for the job.

A perfect single homemade tater tot seasoned with salt and pepper.
And here’s a fun fact: tater tots were never meant to be a household name. Back in the early 1950s, brothers Golden and F. Nephi Grigg were left with piles of potato scraps after making French fries. Instead of tossing them out, they pressed the bits together, fried them, and invented the tot. What started as a way to prevent waste turned into one of the most iconic side dishes in America.
Today, we can make tater tots from fresh potatoes, not scraps, and spice them any way we like. The cool thing is, a Tot Maker shapes them perfectly — just like the frozen ones we grew up with. And it’s simple, because the Tot Maker makes the forming part fast and foolproof
What’s the Big Secret to Homemade Tater Tots? (It’s Not a Mystery)
A lot of people think making tater tots is a big mystery — it’s not and is actually quite easy. The key to great tater tots is the forming part. A lot of recipes call for a binder like flour but you absolutely do not need ANY binders. Keep in mind the starch is nature’s binder!
The potato moisture level after cooking will make the tots anything from almost fluffy, to a little chunky (like the mouth feel of frozen) depending on how dry and finely chopped you make them before pressing out the tots. You can experiment by cooking potatoes different ways to get a fluffier tot or a denser flavored tot, all by adjusting how you cook the tater.
Quick Facts
- Servings: 4 (about 20 tots)
- Prep Time: 10 minutes
- Cook Time: 10 minutes
- Total Time: 20 minutes
- Calories per serving: ~160 (fried in tallow or oil)
What Ingredients Do You Need for Homemade Tater Tots?
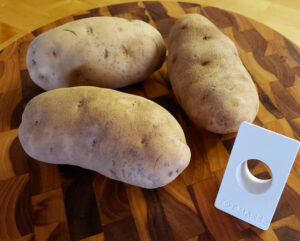
- 2 medium russet potatoes
- ½ teaspoon salt
- ¼ teaspoon black pepper
- Oil or beef tallow for frying (375°F / 190°C)
Optional Add-ins:
- Garlic powder and/or onion powder
- Shredded cheese pressed inside
- Smoked paprika for a deeper twist in flavor
- Chef Paul Prudhomme’s Blackened Redfish Magic seasoning
- Cayenne pepper (for “Hot Tots”)
- Celery salt (for salting after cooking — great flavor)
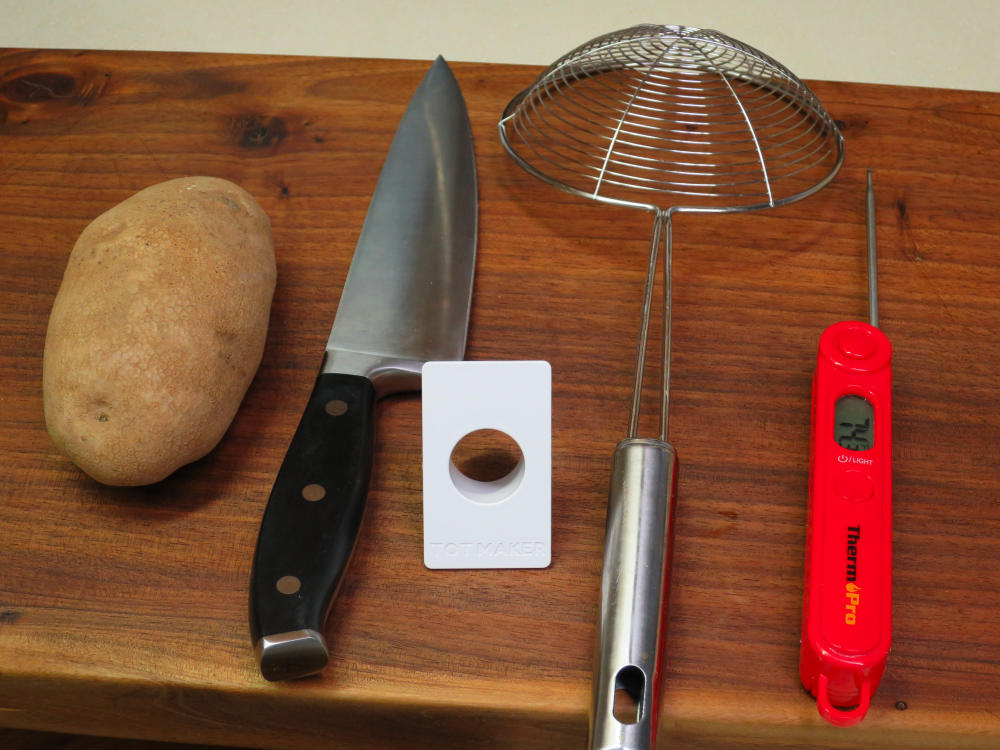
What Equipment Do You Need to Make Tots at Home?
- Microwave, oven, or pot for cooking potatoes
- Knife or peeler
- Deep pan, deep fryer, air fryer, or countertop fryer like a Fry Daddy
- Tot Maker mold
- Paper towels for draining
- Thermometer for measuring oil temperature
- Stainless spider strainer for lowering tots into oil and removing after frying
How Do You Make Tater Tots with a Tot Maker?
- Cook the potatoes
- Microwave: Pierce potatoes, microwave 5 minutes, then immediately wrap in foil, poking several holes in foil to release steam. Let rest on counter 20–30 minutes.
- Boil: Simmer whole potatoes with skin on 20–30 minutes until just cooked through — check by piercing; if a skewer goes through easily, they’re perfect.
- Bake: Wrap in foil, roast at 400°F until tender (about 40 minutes).
- Peel: Slice skin off with a knife or use a peeler.
- Rough chop: Cut the cooked potato into small chunks. No shredding or grating — rough chop gives better texture.
- Press with Tot Maker: Place potato chunks in the Tot Maker mold. Press firmly to form uniform tots.
- Fry or bake: Heat oil or beef tallow to 375°F. Fry tots in small batches for approx. 3 minutes until golden and crisp. Or bake at 425°F for 20–25 minutes, flipping halfway.
- Serve immediately: Sprinkle with extra salt (or celery salt) and enjoy.
How Can You Add Variations to Homemade Tots?
- Air Fryer Tots: Spray lightly with oil, cook at 400°F for 12–15 minutes.
- Cheesy Tots: Press a bit of shredded cheese inside each tot.
- Breakfast Tots: Mix in bacon crumbles before pressing.
- Spiced Tots: Use Blackened Redfish Magic or cayenne for heat.
Pro Tips for Perfect Homemade Tater Tots
- Use a stainless spider strainer to lower and lift tots from hot oil.
- Microwaving is fastest, but boiling or baking works too.
- Rough chopping gives fluffy centers and crisp edges.
- Beef tallow adds rich, old-school fry flavor.
- Celery salt makes an incredible finishing sprinkle right after frying.
- Press firmly in the Tot Maker — it’s what keeps tots together without flour.
What’s the Nutrition in Homemade Tater Tots?
Per serving, fried:
- Calories: 160
- Carbohydrates: 22g
- Protein: 3g
- Fat: 6g
- Fiber: 2g
- Sodium: 240mg
Can You Make and Freeze Tater Tots Ahead of Time?
- Yes — press out tots with the Tot Maker, freeze on a parchment-lined tray, then transfer to freezer bags.
- Store cooked tots in the fridge up to 3 days; reheat in oven or air fryer.

Why Never Use Store-Bought Frozen Tots
Frozen tots are just that-mass produced tots made from scrap potatoes and often taste oily.
Homemade tots have a real potato flavor and an incredible crunch.
Here’s a quick video showing why I toss the frozen ones in the trash:
Watch the video here: NO MORE FROZEN TOTS
FAQ
Can I make tots ahead of time and fry later?
Yes. Just form the tots with the Tot Maker, put on a plate and gently cover with plastic wrap.
Do I need flour to make tater tots?
No. With the Tot Maker, you only need potatoes, salt, and pepper.
What’s the best way to cook potatoes for tots?
Microwaving is fastest, but boiling or baking also works. The key is to make sure potato is not too moist — so you get nice texture and golden brown tots.
Why rough chop instead of shredding?
Rough chopping keeps the texture chunky, like the tots we all grew up eating.
Can I use beef tallow instead of oil?
Yes. Tallow fries beautifully and adds extra flavor.
What seasonings are best for tots?
Celery salt, cayenne (for hot tots), and Chef Paul Prudhomme’s Blackened Redfish Magic all work great — but anything you like can be used to match your taste buds!
How Do You Stay Safe When Frying Tater Tots?
- Never leave oil unattended.
- Keep oil ≤ 375°F.
- Lower tots gently with a spider strainer.
- Keep kids and pets away from the cooking area.
- Have a lid or baking sheet nearby to cover the pot in case of flare-ups (never use water on an oil fire).